FastDFS在web项目中的应用

需求
对P2P项目合同进行管理,在WEB项目中实现对文件的上传下载和删除操作。
名词解释
● 有一些债权:投资人有该债务的权利
注:通常隐含的意思就是:一笔借款常被称为一个债权。
● 一个债权会有一个合同
● 合同是pdf文件
● 债权是债务的对应词,但是在P2P项目中,我们管理的债权,以及合同一般指的是借款人的信息,所以在我们下面创建的creditor_info表中存的是借款人信息
目标
● 实现对pdf文件上传、下载、删除
● 熟练一下Springboot+thymeleaf
案例实现步骤
1. 数据库环境搭建
① 创建数据库fastdfs

② 在该库下创建creditor_info表
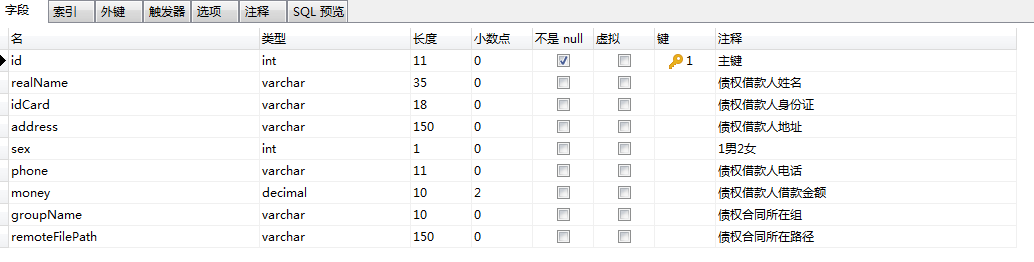
CREATE TABLE `creditor_info` (
`id` int(11) NOT NULL AUTO_INCREMENT COMMENT '主键',
`realName` varchar(35) DEFAULT NULL COMMENT '债权借款人姓名',
`idCard` varchar(18) DEFAULT NULL COMMENT '债权借款人身份证',
`address` varchar(150) DEFAULT NULL COMMENT '债权借款人地址',
`sex` int(1) DEFAULT NULL COMMENT '1男2女',
`phone` varchar(11) DEFAULT NULL COMMENT '债权借款人电话',
`money` decimal(10,2) DEFAULT NULL COMMENT '债权借款人借款金额',
`groupName` varchar(10) DEFAULT NULL COMMENT '债权合同所在组',
`remoteFilePath` varchar(150) DEFAULT NULL COMMENT '债权合同所在路径',
PRIMARY KEY (`id`)
) ENGINE=InnoDB DEFAULT CHARSET=utf8
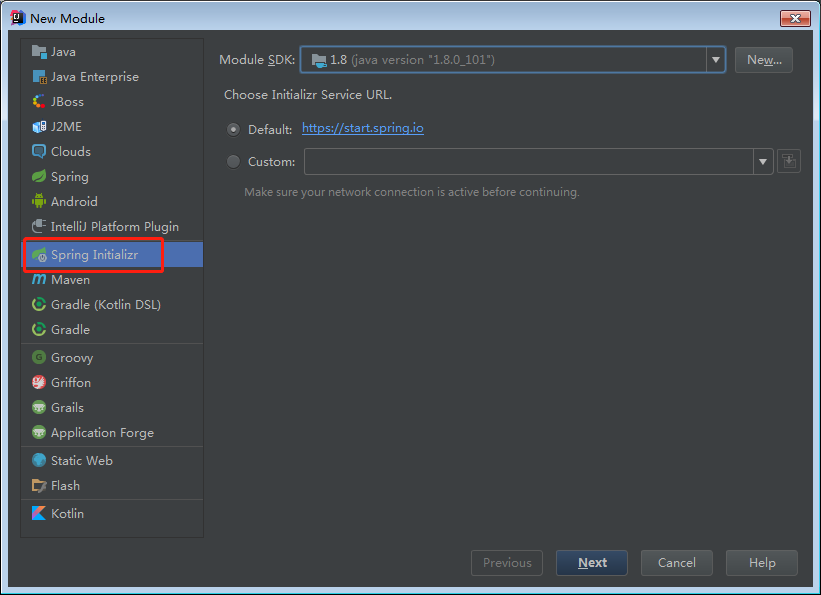
⒉ 开发环境搭建
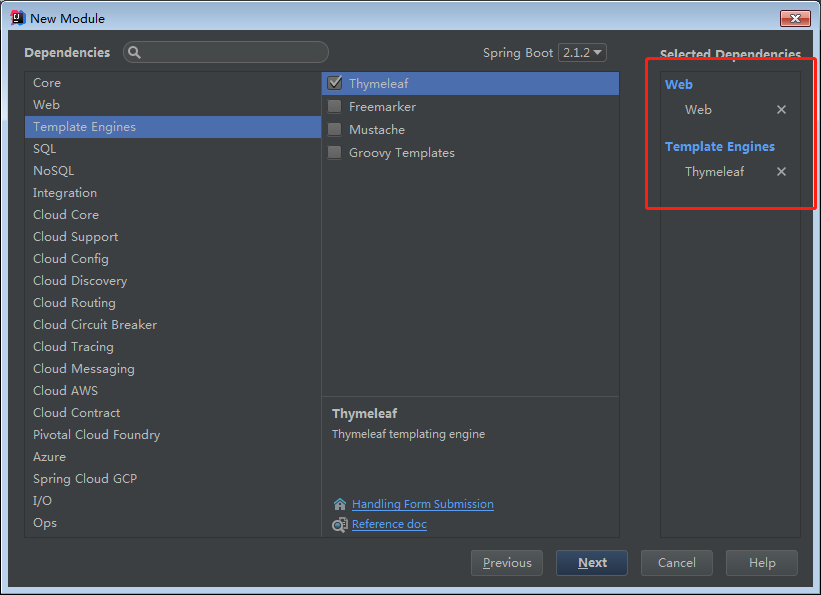
① 创建SpringBoot项目10-fastdfs-web,添加Web和Thymeleaf依赖

② 在pom.xml文件中添加Mybatis依赖及MySQL依赖
<!-- 加载mybatis整合springboot -->
<dependency>
   <groupId>org.mybatis.spring.boot</groupId>
   <artifactId>mybatis-spring-boot-starter</artifactId>
   <!--在springboot的父工程中没有指定版本,我们需要手动指定-->
   <version>1.3.2</version>
</dependency>
<!-- MySQL的jdbc驱动包 -->
<dependency>
   <groupId>mysql</groupId>
   <!--在springboot的父工程中指定了版本,我们就不需要手动指定了-->
   <artifactId>mysql-connector-java</artifactId>
</dependency>
③ 在pom.xml文件中添加resources,指定编译的位置
<resources>
   <resource>
      <directory>src/main/java</directory>
      <includes>
         <include>**/*.xml</include>
      </includes>
   </resource>
   <resource>
      <directory>src/main/resources</directory>
      <includes>
         <include>**/*.*</include>
      </includes>
   </resource>
   <!--如果存在jsp,需要指定jsp文件编译的位置-->
</resources>
④ 在SpringBoot主配置文件application.properties中添加数据库配置信息
#数据库的连接配置信息
spring.datasource.username=root
spring.datasource.password=123456
spring.datasource.driver-class-name=com.mysql.cj.jdbc.Driver
spring.datasource.url=jdbc:mysql://192.168.235.128:3306/fastdfs?useUnicode=true&characterEncoding=utf8&useSSL=false
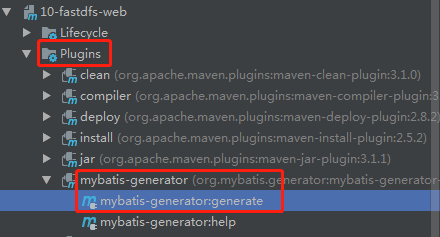
⑤ 使用Mybatis反向工程,生成实体类及mapper映射(参照SpringBoot附录教程)
A、在pom.xml文件中添加反向工程插件
<!--mybatis代码自动生成插件-->
<plugin>
   <groupId>org.mybatis.generator</groupId>
   <artifactId>mybatis-generator-maven-plugin</artifactId>
   <version>1.3.7</version>
   <configuration>
      <!--配置文件的位置-->
      <configurationFile>GeneratorMapper.xml</configurationFile>
      <verbose>true</verbose>
      <overwrite>true</overwrite>
   </configuration>
</plugin>
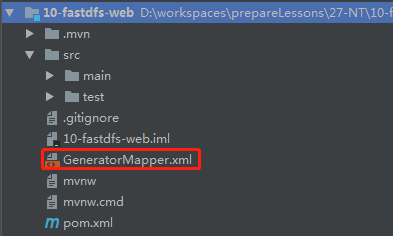
B、 从03-springboot-web中复制GeneratorMapper.xml到当前项目下
C、 修改GeneratorMapper.xml配置文件内容
<?xml version="1.0" encoding="UTF-8"?>
<!DOCTYPE generatorConfiguration
        PUBLIC "-//mybatis.org//DTD MyBatis Generator Configuration 1.0//EN"
        "http://mybatis.org/dtd/mybatis-generator-config_1_0.dtd">
<generatorConfiguration>
    <!-- 指定连接数据库的JDBC驱动包所在位置,指定到你本机的完整路径 -->
    <classPathEntry location="D:/repository/mysql/mysql-connector-java/8.0.13/mysql-connector-java-8.0.13.jar"/>
    <!-- 配置table表信息内容体,targetRuntime指定采用MyBatis3的版本 -->
    <context id="tables" targetRuntime="MyBatis3">
        <!-- 抑制生成注释,由于生成的注释都是英文的,可以不让它生成 -->
        <commentGenerator>
            <property name="suppressAllComments" value="true" />
        </commentGenerator>
        <!-- 配置数据库连接信息 注意:使用高版本的驱动 url后面应该加属性nullCatalogMeansCurrent=true,否则生成有问题 -->
        <jdbcConnection driverClass="com.mysql.cj.jdbc.Driver"
                        connectionURL="jdbc:mysql://192.168.235.128:3306/fastdfs?nullCatalogMeansCurrent=true"
                        userId="root"
                        password="123456">
        </jdbcConnection>
        <!-- 生成model类,targetPackage指定model类的包名, targetProject指定生成的model放在eclipse的哪个工程下面-->
        <javaModelGenerator targetPackage="com.bjpowernode.fastdfs.model" targetProject="src/main/java">
            <property name="enableSubPackages" value="false" />
            <property name="trimStrings" value="false" />
        </javaModelGenerator>
        <!-- 生成MyBatis的Mapper.xml文件,targetPackage指定mapper.xml文件的包名, targetProject指定生成的mapper.xml放在eclipse的哪个工程下面 -->
        <sqlMapGenerator targetPackage="com.bjpowernode.fastdfs.mapper" targetProject="src/main/java">
            <property name="enableSubPackages" value="false" />
        </sqlMapGenerator>
        <!-- 生成MyBatis的Mapper接口类文件,targetPackage指定Mapper接口类的包名, targetProject指定生成的Mapper接口放在eclipse的哪个工程下面 -->
        <javaClientGenerator type="XMLMAPPER" targetPackage="com.bjpowernode.fastdfs.mapper" targetProject="src/main/java">
            <property name="enableSubPackages" value="false" />
        </javaClientGenerator>
        <!-- 数据库表名及对应的Java模型类名 -->
        <table tableName="creditor_info"
               domainObjectName="CreditorInfo"
               enableCountByExample="false"
               enableUpdateByExample="false"
               enableDeleteByExample="false"
               enableSelectByExample="false"
               selectByExampleQueryId="false"/>
    </context>
</generatorConfiguration>
D、双击生成
⑥ 创建相关的包和类
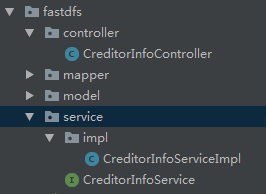
在com.bjpowernode.fast包下创建controller ,service 包,及其子包impl
创建CreditorInfoController类
创建CreditorInfoService接口
创建CreditorInfoServiceImpl实现类
3. 功能实现-展示所有债权信息
① 在CreditorInfoController类中创建index方法,将CreditorInfoService注入到controller中
@Controller
public class CreditorInfoController {
    @Autowired
    private CreditorInfoService creditorInfoService;

    @GetMapping("/fastdfs/index")
    public String index(Model model){
        List<CreditorInfo> creditorInfoList = creditorInfoService.getAllCreditorInfo();
        model.addAttribute("creditorInfoList",creditorInfoList);
        //模板页面,不是jsp
        return "index";
    }
}
② 在CreditorInfoService中提供getAllCreditorInfo方法
public interface CreditorInfoService {
    /**
     * 获取所有债权信息
     * @return
     */
    List<CreditorInfo> getAllCreditorInfo();
}
③ 在CreditorInfoServiceImpl中对getAllCreditorInfo方法进行实现
@Service
public class CreditorInfoServiceImpl implements CreditorInfoService {
    @Autowired
    private CreditorInfoMapper creditorInfoMapper;
    @Override
    public List<CreditorInfo> getAllCreditorInfo() {
        return creditorInfoMapper.selectAllCreditorInfo();
    }
}
④ 因为是SpringBoot项目,所以需要在Mapper接口上加一个Mapper注解
@Mapper
public interface CreditorInfoMapper {
⑤ 在CreditorInfoMapper类中添加selectAllCreditorInfo方法
List<CreditorInfo> selectAllCreditorInfo();
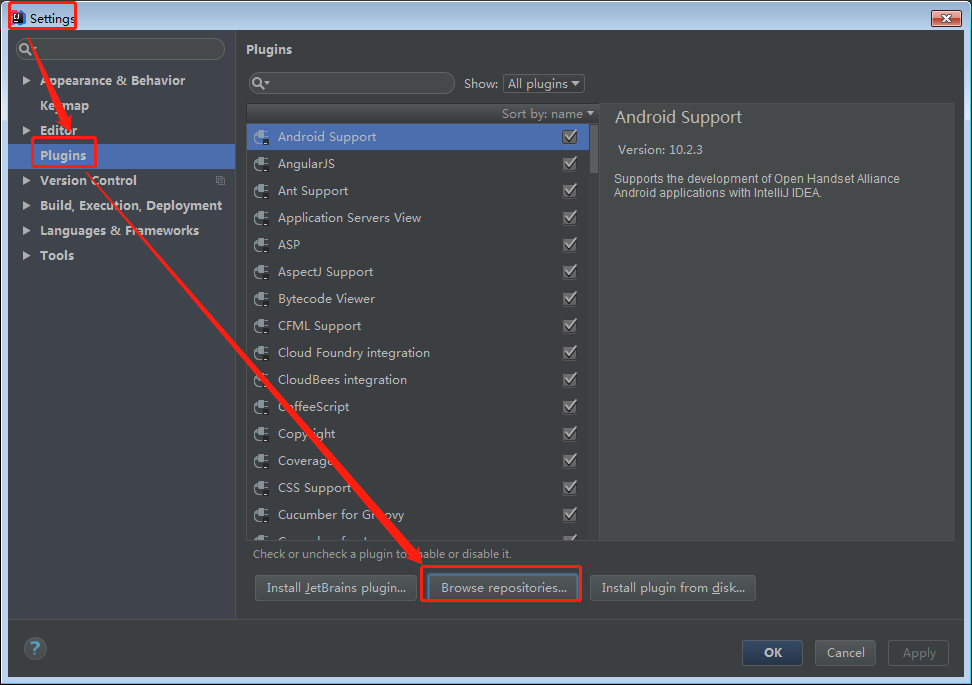
⑥ 在IDEA中安装free Mybatis插件
该插件可以通过点击Mapper接口中的方法,进入到.xml文件
A、 SettingsàpluginsàBrowse repositories
B、 在插件库中搜索,free mybatis安装
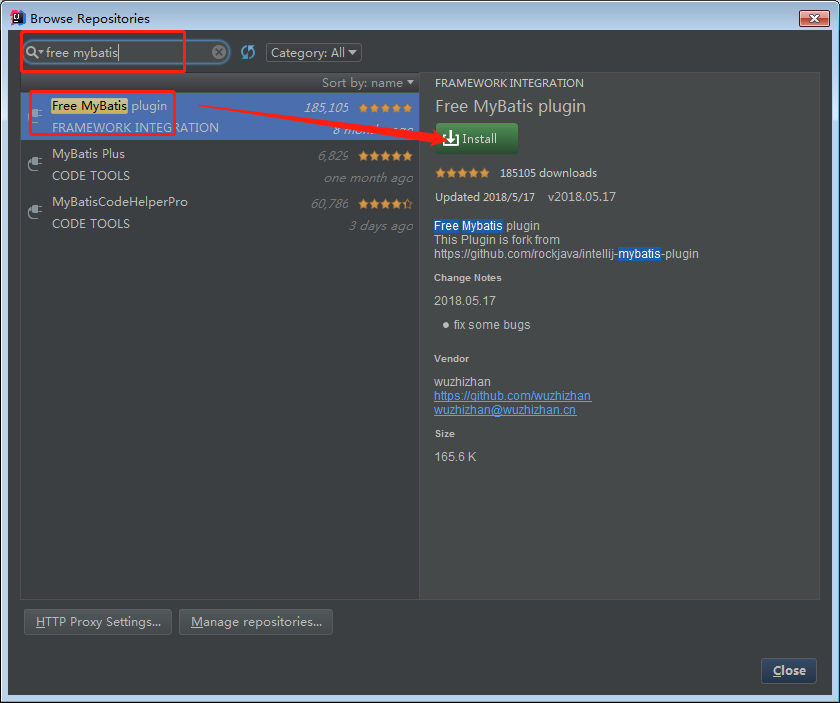
C、 插件安装完毕,需要重启IDEA
⑦ 在CreditorInfoMapper.xml文件中添加SQL语句
<select id="selectAllCreditorInfo" resultMap="BaseResultMap">
    select
    <include refid="Base_Column_List"/>
    from creditor_info
</select>
⑧ 展示页面的设计
A、 在项目的templates目录下创建index.html

B、 百度搜索bootstrap表格,挑选自己喜欢风格的表格,将代码拷贝到index.html中
我这里使用的是http://www.bjpowernode.com/try/try.php?
filename=bootstrap3-table-striped表格进行改写
C、 在html标签上加上Thymeleaf的命名空间
<!DOCTYPE html>
<html lang="en" xmlns:th="http://www.thymeleaf.org">
D、 修改index.html内容
<!DOCTYPE html>
<html xmlns:th="http://www.thymeleaf.org">
<head>
    <meta charset="utf-8">
    <title>债权合同管理</title>
    <link rel="stylesheet" th:href="@{/css/bootstrap-3.3.7.min.css}">
    <script th:src="@{/js/jquery-2.1.1.min.js}"></script>
    <script th:src="@{/js/bootstrap-3.3.7.min.js}"></script>
</head>
<body>
<table class="table table-striped">
    <caption>债权合同信息列表</caption>
    <thead>
    <tr>
        <th>序号</th>
        <th>债权借款人姓名</th>
        <th>债权借款人身份证</th>
        <th>债权借款人住址</th>
        <th>债权借款人手机号</th>
        <th>债权借款人性别</th>
        <th>债权借款人借款金额</th>
    </tr>
    </thead>
    <tbody>
    <tr th:each="creditorInfo:${creditorInfoList}">
        <td th:text="${creditorInfoStat.count}"></td>
        <td th:text="${creditorInfo.realname}"></td>
        <td th:text="${creditorInfo.idcard}"></td>
	<td th:text="${creditorInfo.address}"></td>
        <td th:text="${creditorInfo.phone}"></td>
        <td th:text="${creditorInfo.sex == 1 ?'男':'女'}"></td>
        <td th:text="${creditorInfo.money}"></td>
    </tr>
    </tbody>
</table>
</body>
</html>
注意:我们从网络上拷贝过来的内容css,js等是联网获取的,我们这里可以从04-FastDFS\resources获取,并放在项目的static的相关目录下,在页面上引用
⑨ 向数据库中加几条数据

⑩ 启动项目,访问http://localhost:8080/fastdfs/index 查看效果

⑪ 调整页面样式
<body style="margin: 50px">
4. 功能实现-为某一个债权合同上传文件
① 在index.html中添加操作列
<th>合同管理</th>

<td>
    <!--为哪个合同上传,需要将合同的id传递过去-->
    <a th:href="@{'/fastdfs/toUpload?id=' + ${creditorInfo.id}}">上传</a>
    下载
    删除
</td>
② 在CreditorController中添加跳转到上传页面的方法
@GetMapping("/fastdfs/toUpload")
public String toUpload(Model model, @RequestParam("id") Integer id){
    model.addAttribute("id",id);
    return "upload";
}
③ 在templates下创建upload.html页面
在网上搜索bootstrap表单,并对其内容进行修改,我这里使用的是
http://www.bjpowernode.com/try/try2.php?filename=bootstrap3-form-inline
<!DOCTYPE html>
<html xmlns:th="http://www.thymeleaf.org">
<head>
    <meta charset="utf-8">
    <title>债权合同上传</title>
    <link rel="stylesheet" th:href="@{/css/bootstrap-3.3.7.min.css}">
    <script th:src="@{/js/jquery-2.1.1.min.js}"></script>
    <script th:src="@{/js/bootstrap-3.3.7.min.js}"></script>
</head>
<body>
    <form th:action="@{/fastdfs/upload}" class="form-inline" role="form" method="post" enctype="multipart/form-data">
        <div class="form-group">
            <label class="sr-only" for="fileName">文件输入</label>
            <input type="file" id="fileName" name="fileName">
        </div>
        <input type="hidden" name="id" th:value="${id}">
        <button type="submit" class="btn btn-default">提交</button>
    </form>
</body>
</html>
注意:
● 文件上传必须是post请求
● enctype必须为multipart/form-data
● 合同的id通过隐藏域传递
④ 在pom.xml文件中加入FastDFS客户端的jar包依赖
<!--加入FastDFS的java客户端依赖-->
<dependency>
   <groupId>org.csource</groupId>
   <artifactId>fastdfs-client-java</artifactId>
   <version>1.27-SNAPSHOT</version>
</dependency>
⑤ 将FastDFS客户端的配置文件fast_client.conf拷贝到resources目录下

⑥ 将原来我们封装的FastDFS类拷贝到fastdfs包下,修改其中的file_upload方法,定义一些参数
去掉主方法,新的fileUpload写法如下:
/上传文件的方法
public static String[] fileUpload(byte[] fileBytes,String fileExt){
    String [] uploadArray = null;
    try {
        //1. 获取StorageClient对象
        StorageClient storageClient = getStorageClient();
        //2.上传文件  第一个参数:本地文件路径 第二个参数:上传文件的后缀 第三个参数:文件信息
        uploadArray = storageClient.upload_file(fileBytes,fileExt,null);
    } catch (IOException e) {
        e.printStackTrace();
    } catch (MyException e) {
        e.printStackTrace();
    } finally {
        closeFastDFS();
    }
    return uploadArray;
}
⑦ 在CreditorController中添加处理上传文件的方法
@PostMapping("/fastdfs/upload")
public @ResponseBody String upload(@RequestParam("id") Integer id, @RequestParam("fileName") MultipartFile file){
    //原来文件上传是将文件写到本地或者远程服务器的某个目录下
    //现在的文件上传是将文件上传到fastdfs文件服务器上
    //1表示上传失败  0表示成功
    int result = 1;
    //abc.txt -->txt
    String fileExt = file.getOriginalFilename().substring(file.getOriginalFilename().indexOf(".") + 1);
    try {
        String[] uploadArray = FastDFS.fileUpload(file.getBytes(),fileExt);
        if(uploadArray != null && uploadArray.length ==2){
            //文件上传到fastDFS成功  ,将合同文件路径更新到债权记录中
            CreditorInfo creditorInfo = new CreditorInfo();
            creditorInfo.setId(id);
            creditorInfo.setGroupname(uploadArray[0]);
            creditorInfo.setRemotefilepath(uploadArray[1]);
            int updateRow = creditorService.updateCreditorInfo(creditorInfo);
            //数据库更新成功
            if(updateRow > 0){
                result = 0;
            }
        }
    } catch (IOException e) {
        e.printStackTrace();
    }
    return "<script>window.parent.uploadOK('"+result+"')</script>";
}
⑧ 在CreditorInfoService中添加updateCreditorInfo方法
/**
 * 更新债权信息
 * @param creditorInfo
 * @return
 */
int updateCreditorInfo(CreditorInfo creditorInfo);
⑨ 在CreditorInfoServiceImpl中添加updateCreditorInfo方法实现
@Override
public int updateCreditorInfo(CreditorInfo creditorInfo) {
    return creditorInfoMapper.updateByPrimaryKeySelective(creditorInfo);
}
⑩ 在upload.html做一个类似ajax的页面不刷新效果
● 在upload.html页面中加一个iframe
● upload.html页面中的form中的target设置为iframe的name
● 在iframe的父页面中,写一个函数,处理上传结果
<!DOCTYPE html>
<html xmlns:th="http://www.thymeleaf.org">
<head>
    <meta charset="utf-8">
    <title>债权合同上传</title>
    <link rel="stylesheet" th:href="@{/css/bootstrap-3.3.7.min.css}">
    <script th:src="@{/js/jquery-2.1.1.min.js}"></script>
    <script th:src="@{/js/bootstrap-3.3.7.min.js}"></script>
</head>
<body>
    <form th:action="@{/fastdfs/upload}" class="form-inline" role="form" method="post" target="uploadFrame" enctype="multipart/form-data">
        <div class="form-group">
            <label class="sr-only" for="fileName">文件输入</label>
            <input type="file" id="fileName" name="fileName">
        </div>
        <input type="hidden" id="id" name="id" th:value="${id}">
        <button type="submit" class="btn btn-default">提交</button>
    </form>
    <iframe name="uploadFrame" style="display: none;"></iframe>
    <script type="text/javascript" th:inline="javascript">
        function uploadOK(result){
            if(result == 0){
                //文件上传成功
                alert("文件上传成功");
                var contextPath = [[${#request.getContextPath()}]];
                window.location.href = contextPath + "/fastdfs/index";
            }else{
                alert("文件上传失败");
            }
        }
    </script>
</body>
</html>
⑪ 如果上传文件超出了1M,需要在application.properties中配置SpringBoot上传文件的最大限制
#SpringBoot上传文件的最大限制
spring.servlet.multipart.max-file-size=10MB
注意:如果提示找不到tracker_server,看看是否编译到target中
5. 功能实现-下载某一个债权合同
① 修改index.html页面,下载加连接,并做判断
<td>
    <span th:if="${creditorInfo.getGroupname() ne null && creditorInfo.remotefilepath ne null}">
        <a th:href="@{'/fastdfs/download?id=' + ${creditorInfo.id}}">下载</a>
        删除
    </span>
    <span th:unless="${creditorInfo.getGroupname() ne null && creditorInfo.remotefilepath ne null}">
        <!--为哪个合同上传,需要将合同的id传递过去-->
        <a th:href="@{'/fastdfs/toUpload?id=' + ${creditorInfo.id}}">上传</a>
    </span>
</td>
② 在CreditorController中,完成下载的请求
● ResponseEntity通常用于返回文件流
● @ResponseBody可以直接返回Json结果,
● @ResponseEntity不仅可以返回json结果,还可以定义返回的HttpHeaders和HttpStatus
● ResponseEntity的优先级高于@ResponseBody。在不是ResponseEntity的情况下才去检查有没有@ResponseBody注解。如果响应类型是ResponseEntity可以不写@ResponseBody注解,写了也没有关系。
@GetMapping("/fastdfs/download")
public ResponseEntity<byte[]> download(@RequestParam("id") Integer id){
    //根据债权id获取 债权对象
    CreditorInfo creditorInfo = creditorInfoService.getCreditorInfoById(id);
    String extName = creditorInfo.getRemotefilepath().substring(creditorInfo.getRemotefilepath().indexOf("."));
    byte [] fileBytes = FastDFS.fileDownload(creditorInfo.getGroupname(),creditorInfo.getRemotefilepath());


    HttpHeaders httpHeaders = new HttpHeaders();
    httpHeaders.setContentType(MediaType.APPLICATION_OCTET_STREAM);//流类型
    httpHeaders.setContentDispositionFormData("attachment",System.currentTimeMillis() + extName);

    ResponseEntity<byte[]> responseEntity = new ResponseEntity<byte[]>(fileBytes,httpHeaders, HttpStatus.OK);
    return responseEntity;
}
③ 在CreditorService接口中添加getCreditorInfoById的方法
/**
 * 根据合同id获取债权信息
 * @param id
 * @return
 */
CreditorInfo getCreditorInfoById(Integer id);
④ 在CreditorServiceImpl中添加getCreditorInfoById方法的实现
@Override
public CreditorInfo getCreditorInfoById(Integer id) {
    return creditorInfoMapper.selectByPrimaryKey(id);
}
⑤ 修改FastDFS类中fileDown方法的实现,传递参数
//下载文件的方法
public static byte[] fileDownload(String group,String remoteFile){
    byte[] fileBytes = null;
    try {
        //1. 获取StorageClient对象
        StorageClient storageClient = getStorageClient();
        //2.下载文件 返回0表示成功,其它均表示失败
        fileBytes = storageClient.download_file(group,remoteFile);
    } catch (IOException e) {
        e.printStackTrace();
    } catch (MyException e) {
        e.printStackTrace();
    } finally {
        closeFastDFS();
    }
    return fileBytes;
}
⑥ 浏览器访问下载测试效果
6. 功能实现-删除某一个债权合同,使用ajax实现异步删除
① 在index.html页面为删除加超链接
<span th:if="${creditorInfo.getGroupname() ne null && creditorInfo.remotefilepath ne null}">
    <a th:href="@{'/fastdfs/download?id=' + ${creditorInfo.id}}">下载</a>
    <a th:href="@{'javascript:deleteFile('+ ${creditorInfo.id} +')'}">删除</a>
</span>
② 在index.html页面提供js方法,并发送ajax请求,对响应结果进行处理
<script type="text/javascript" th:inline="javascript">
    function deleteFile(id){
        //获取项目的上下文根
        var contextPath = [[${#request.getContextPath()}]];
        $.ajax({
            url:contextPath +"/fastdfs/fileDelete",
            type:"post",
            data:{
                "id":id
            },
            success:function(responseMsg){
                if(responseMsg==0){
                    alert("删除成功");
			window.location.reload();
                }else{
                    alert("删除失败");
                }
            }
        });
    }
</script>
③ 在CreditorController中处理删除请求
注意:删除FastDFS和清除数据库,所以我们将这些业务都放在service中进行事务的处理
@RequestMapping("/fastdfs/fileDelete")
public @ResponseBody String fileDelete(@RequestParam("id") Integer id){
    int result = 1;
    try {
        result = creditorService.deleteContract(id);
    } catch (Exception e) {
        e.printStackTrace();
    }
    return String.valueOf(result);
}
④ 在CreditorService接口中加删除合同的方法deleteContract
因为目前提供的方法,如果group和remoteFilePath为空就不更新,所以我们需要自己提供
/**
 * 删除合同
 * @param id
 * @return
 */
int deleteContract(Integer id);
⑤ 在CreditorServiceImpl类中对deleteContract方法进行实现
@Override
@Transactional //加上该注解控制事务
public int deleteContract(Integer id) {
    // 1 删除失败;0 删除成功
    int result = 1;
    //根据债权id获取债权信息
    CreditorInfo creditorInfo = creditorInfoMapper.selectByPrimaryKey(id);
    /**
     * 注意:事务控制的数据库,所以我们先对数据库进行更新,在操作FastDFS
     * 如果操作FastDFS失败了,那么对数据库的操作回滚
     */
    //更新数据库债权表的合同路径及组
    int updateRow = creditorInfoMapper.updateConstractById(id);
    if(updateRow > 0){
        //如果数据库更新成功,那么删除FastDFS上的文件
        int num = FastDFS.fileDelete(creditorInfo.getGroupname(),creditorInfo.getRemotefilepath());
        if(num == 0){
            //如果删除成功,那么将整个操作结果设置为0,表示成功
            result = 0;
        }else{
            //如果删除FastDFS上的文件失败,我们抛出一个运行异常,回滚事务
            throw new RuntimeException("FastDFS文件删除失败");
        }
    }

    return result;
}
⑥ 在CreditorMapper类中添加更新的方法
/**
 * 根据债权的id,将组和合同路径更新为null
 * @param id
 * @return
 */
int updateConstractById(Integer id);
⑦ 在CreditorMapper.xml中添加更新的方法
<update id="updateConstractById" parameterType="java.lang.Integer">
  update creditor_info
  set
  groupName = NULL ,
  remoteFilePath = NULL
  where id = #{id,jdbcType=INTEGER}
</update>
⑧ 修改FastDFS类中的fileDelete方法,提供参数
//删除文件的方法
public static int fileDelete(String group ,String remoteFile){
    int num = 1;
    try {
        //1. 获取StorageClient对象
        StorageClient storageClient = getStorageClient();
        //2.删除文件 返回0表示成功,其它均表示失败
        num = storageClient.delete_file(group,remoteFile);
    } catch (IOException e) {
        e.printStackTrace();
    } catch (MyException e) {
        e.printStackTrace();
    } finally {
        closeFastDFS();
    }
    return num;
}
⑨ 在Application类上开启事务支持
@SpringBootApplication
@EnableTransactionManagement
public class Application {
   public static void main(String[] args) {
      SpringApplication.run(Application.class, args);
   }
}
7. 功能实现-弹层组建layer的使用(简单介绍)
官网:https://www.layui.com
2018开源软件排行比较靠前