专注Java教育14年
全国咨询/投诉热线:400-8080-105
更新时间:2021-09-30 10:17:20 来源:动力节点 浏览1512次

项目结构截图:
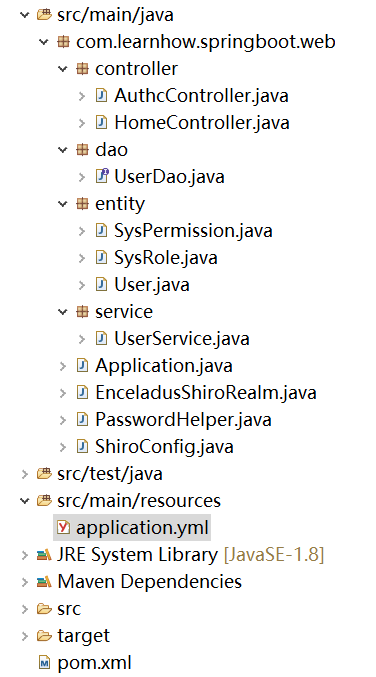
项目在结构上没有任何特殊之处,基本就是SpringMVC的传统结构重点需要关注的是3个Entity类、2个Controller类和1个Config类。
首先,提供pom的完整文档结构:
<project xmlns="http://maven.apache.org/POM/4.0.0"
    xmlns:xsi="http://www.w3.org/2001/XMLSchema-instance"
    xsi:schemaLocation="http://maven.apache.org/POM/4.0.0 http://maven.apache.org/xsd/maven-4.0.0.xsd">
    <modelVersion>4.0.0</modelVersion>
    <groupId>com.learnhow.springboot</groupId>
    <artifactId>web</artifactId>
    <version>0.0.1-SNAPSHOT</version>
    <packaging>jar</packaging>
    <name>web</name>
    <url>http://maven.apache.org</url>
    <parent>
        <groupId>org.springframework.boot</groupId>
        <artifactId>spring-boot-starter-parent</artifactId>
        <version>2.0.4.RELEASE</version>
        <relativePath /> <!-- lookup parent from repository -->
    </parent>
    <properties>
        <project.build.sourceEncoding>UTF-8</project.build.sourceEncoding>
        <java.version>1.8</java.version>
    </properties>
    <dependencies>
        <dependency>
            <groupId>org.springframework.boot</groupId>
            <artifactId>spring-boot-starter</artifactId>
        </dependency>
        <dependency>
            <groupId>org.springframework.boot</groupId>
            <artifactId>spring-boot-starter-test</artifactId>
            <scope>test</scope>
        </dependency>
        <dependency>
            <groupId>org.springframework.boot</groupId>
            <artifactId>spring-boot-starter-web</artifactId>
        </dependency>
        <dependency>
            <groupId>org.springframework.boot</groupId>
            <artifactId>spring-boot-starter-data-jpa</artifactId>
        </dependency>
        <dependency>
            <groupId>mysql</groupId>
            <artifactId>mysql-connector-java</artifactId>
        </dependency>
        <dependency>
            <groupId>org.apache.shiro</groupId>
            <artifactId>shiro-spring</artifactId>
            <version>1.4.0</version>
        </dependency>
        <dependency>
            <groupId>org.springframework.boot</groupId>
            <artifactId>spring-boot-devtools</artifactId>
            <optional>true</optional>
        </dependency>
    </dependencies>
    <build>
        <plugins>
            <plugin>
                <groupId>org.springframework.boot</groupId>
                <artifactId>spring-boot-maven-plugin</artifactId>
                <configuration>
                    <fork>true</fork>
                </configuration>
            </plugin>
        </plugins>
    </build>
</project>
其次,创建数据库和表结构。由于我们采用jpa作为数据库持久层框架,因此我们将建表的任务交给框架自动完成,我们只需要在entity中写清楚对应关系即可。
CREATE DATABASE enceladus; // enceladus是数据库的名称
application.yml
server:
   port: 8088
spring:
   application:
      name: shiro
   datasource:
      url: jdbc:mysql://192.168.31.37:3306/enceladus
      username: root
      password: 12345678
      driver-class-name: com.mysql.jdbc.Driver
   jpa:
      database: mysql
      showSql: true
      hibernate:
         ddlAuto: update
      properties:
         hibernate:
            dialect: org.hibernate.dialect.MySQL5Dialect
            format_sql: true
最基础的Shiro配置至少需要三张主表分别代表用户(user)、角色(role)、权限(permission),用户和角色,角色与权限之间都是ManyToMany的对应关系,不熟悉实体对应关系的小伙伴可以先去熟悉一下Hibernate。
User.java
import java.io.Serializable;
import java.util.List;
import javax.persistence.Entity;
import javax.persistence.FetchType;
import javax.persistence.GeneratedValue;
import javax.persistence.Id;
import javax.persistence.JoinColumn;
import javax.persistence.JoinTable;
import javax.persistence.ManyToMany;
import javax.persistence.Table;
@Entity
@Table(name = "user_t")
public class User implements Serializable {
    private static final long serialVersionUID = -3320971805590503443L;
    @Id
    @GeneratedValue
    private long id;
    private String username;
    private String password;
    private String salt;
    @ManyToMany(fetch = FetchType.EAGER)
    @JoinTable(name = "user_role_t", joinColumns = { @JoinColumn(name = "uid") }, inverseJoinColumns = {
            @JoinColumn(name = "rid") })
    private List<SysRole> roles;
    public long getId() {
        return id;
    }
    public void setId(long id) {
        this.id = id;
    }
    public String getUsername() {
        return username;
    }
    public void setUsername(String username) {
        this.username = username;
    }
    public String getPassword() {
        return password;
    }
    public void setPassword(String password) {
        this.password = password;
    }
    public String getSalt() {
        return salt;
    }
    public void setSalt(String salt) {
        this.salt = salt;
    }
    public List<SysRole> getRoles() {
        return roles;
    }
    public void setRoles(List<SysRole> roles) {
        this.roles = roles;
    }
    public String getCredentialsSalt() {
        return username + salt + salt;
    }
    @Override
    public String toString() {
        return "User [id=" + id + ", username=" + username + "]";
    }
}
user
SysRole.java
import java.io.Serializable;
import java.util.List;
import javax.persistence.Entity;
import javax.persistence.FetchType;
import javax.persistence.GeneratedValue;
import javax.persistence.Id;
import javax.persistence.JoinColumn;
import javax.persistence.JoinTable;
import javax.persistence.ManyToMany;
import javax.persistence.Table;
@Entity
@Table(name = "role_t")
public class SysRole implements Serializable {
    private static final long serialVersionUID = -8687790154329829056L;
    @Id
    @GeneratedValue
    private Integer id;
    private String role;
    @ManyToMany(fetch = FetchType.EAGER)
    @JoinTable(name = "role_permission_t", joinColumns = { @JoinColumn(name = "rid") }, inverseJoinColumns = {
            @JoinColumn(name = "pid") })
    private List<SysPermission> permissions;
    @ManyToMany
    @JoinTable(name = "user_role_t", joinColumns = { @JoinColumn(name = "rid") }, inverseJoinColumns = {
            @JoinColumn(name = "uid") })
    private List<User> users;

    public Integer getId() {
        return id;
    }
    public void setId(Integer id) {
        this.id = id;
    }
    public String getRole() {
        return role;
    }
    public void setRole(String role) {
        this.role = role;
    }
    public List<SysPermission> getPermissions() {
        return permissions;
    }
    public void setPermissions(List<SysPermission> permissions) {
        this.permissions = permissions;
    }
    public List<User> getUsers() {
        return users;
    }
    public void setUsers(List<User> users) {
        this.users = users;
    }
}
role
SysPermission.java
import java.io.Serializable;
import java.util.List;
import javax.persistence.Entity;
import javax.persistence.GeneratedValue;
import javax.persistence.Id;
import javax.persistence.JoinColumn;
import javax.persistence.JoinTable;
import javax.persistence.ManyToMany;
import javax.persistence.Table;
@Entity
@Table(name = "permission_t")
public class SysPermission implements Serializable {
    private static final long serialVersionUID = 353629772108330570L;
    @Id
    @GeneratedValue
    private Integer id;
    private String name;
    @ManyToMany
    @JoinTable(name = "role_permission_t", joinColumns = { @JoinColumn(name = "pid") }, inverseJoinColumns = {
            @JoinColumn(name = "rid") })
    private List<SysRole> roles;

    public Integer getId() {
        return id;
    }
    public void setId(Integer id) {
        this.id = id;
    }
    public String getName() {
        return name;
    }
    public void setName(String name) {
        this.name = name;
    }
    public List<SysRole> getRoles() {
        return roles;
    }
    public void setRoles(List<SysRole> roles) {
        this.roles = roles;
    }
}
perm
在注明对应关系以后,jpa会帮助我们创建3张实体表和2张中间表:
最后我们还需要初始化一些基础数据:
INSERT INTO `permission_t` VALUES (1, 'Retrieve');
INSERT INTO `permission_t` VALUES (2, 'Create');
INSERT INTO `permission_t` VALUES (3, 'Update');
INSERT INTO `permission_t` VALUES (4, 'Delete');
INSERT INTO `role_t` VALUES (1, 'guest');
INSERT INTO `role_t` VALUES (2, 'user');
INSERT INTO `role_t` VALUES (3, 'admin');
INSERT INTO `role_permission_t` VALUES (1, 1);
INSERT INTO `role_permission_t` VALUES (1, 2);
INSERT INTO `role_permission_t` VALUES (2, 2);
INSERT INTO `role_permission_t` VALUES (3, 2);
INSERT INTO `role_permission_t` VALUES (1, 3);
INSERT INTO `role_permission_t` VALUES (2, 3);
INSERT INTO `role_permission_t` VALUES (3, 3);
INSERT INTO `role_permission_t` VALUES (4, 3);
至此,前期的准备工作已经完成。下面为了让Shiro能够在项目中生效我们需要通过代码的方式提供配置信息。Shiro的安全管理提供了两个层面的控制:(1)用户认证:需要用户通过登陆证明你是你自己。(2)权限控制:在证明了你是你自己的基础上系统为当前用户赋予权限。后者我们已经在数据库中完成了大部分配置。
用户认证的常规手段就是登陆认证,在目前的情况下我们认为只有用户自己知道登陆密码。不过Shiro为我们做的更多,它还提供了一套能够很方便我们使用的密码散列算法。因为普通的散列技巧可以很容易的通过暴力手段破解,我们可以在散列的过程中加入一定的算法复杂度(增加散列次数与Salt)从而解决这样的问题。
import org.apache.shiro.crypto.RandomNumberGenerator;
import org.apache.shiro.crypto.SecureRandomNumberGenerator;
import org.apache.shiro.crypto.hash.SimpleHash;
import org.apache.shiro.util.ByteSource;
import com.learnhow.springboot.web.entity.User;
public class PasswordHelper {
    private RandomNumberGenerator randomNumberGenerator = new SecureRandomNumberGenerator();
    public static final String ALGORITHM_NAME = "md5"; // 基础散列算法
    public static final int HASH_ITERATIONS = 2; // 自定义散列次数
    public void encryptPassword(User user) {
        // 随机字符串作为salt因子,实际参与运算的salt我们还引入其它干扰因子
        user.setSalt(randomNumberGenerator.nextBytes().toHex());
        String newPassword = new SimpleHash(ALGORITHM_NAME, user.getPassword(),
                ByteSource.Util.bytes(user.getCredentialsSalt()), HASH_ITERATIONS).toHex();
        user.setPassword(newPassword);
    }
}
这个类帮助我们解决用户注册的密码散列问题,当然我们还需要使用同样的算法来保证在登陆的时候密码能够被散列成相同的字符串。如果两次散列的结果不同系统就无法完成密码比对,因此在计算散列因子的时候我们不能引入变量,例如我们可以将username作为salt因子加入散列算法,但是不能选择password或datetime,具体原因各位请手动测试。
另外为了帮助Shiro能够正确为当前登陆用户做认证和赋权,我们需要实现自定义的Realm。具体来说就是实现doGetAuthenticationInfo和doGetAuthorizationInfo,这两个方法前者负责登陆认证后者负责提供一个权限信息。
import org.apache.shiro.authc.AuthenticationException;
import org.apache.shiro.authc.AuthenticationInfo;
import org.apache.shiro.authc.AuthenticationToken;
import org.apache.shiro.authc.SimpleAuthenticationInfo;
import org.apache.shiro.authz.AuthorizationInfo;
import org.apache.shiro.authz.SimpleAuthorizationInfo;
import org.apache.shiro.realm.AuthorizingRealm;
import org.apache.shiro.subject.PrincipalCollection;
import org.apache.shiro.util.ByteSource;
import org.springframework.beans.factory.annotation.Autowired;
import com.learnhow.springboot.web.entity.SysPermission;
import com.learnhow.springboot.web.entity.SysRole;
import com.learnhow.springboot.web.entity.User;
import com.learnhow.springboot.web.service.UserService;
public class EnceladusShiroRealm extends AuthorizingRealm {
    @Autowired
    private UserService userService;
    @Override
    protected AuthorizationInfo doGetAuthorizationInfo(PrincipalCollection principals) {
        SimpleAuthorizationInfo authorizationInfo = new SimpleAuthorizationInfo();
        String username = (String) principals.getPrimaryPrincipal();
        User user = userService.findUserByName(username);
        for (SysRole role : user.getRoles()) {
            authorizationInfo.addRole(role.getRole());
            for (SysPermission permission : role.getPermissions()) {
                authorizationInfo.addStringPermission(permission.getName());
            }
        }
        return authorizationInfo;
    }
    @Override
    protected AuthenticationInfo doGetAuthenticationInfo(AuthenticationToken token) throws AuthenticationException {
        String username = (String) token.getPrincipal();
        User user = userService.findUserByName(username);
        if (user == null) {
            return null;
        }
        SimpleAuthenticationInfo authenticationInfo = new SimpleAuthenticationInfo(user.getUsername(), user.getPassword(),
                ByteSource.Util.bytes(user.getCredentialsSalt()), getName());
        return authenticationInfo;
    }
}
还记得前面我们说过,认证的时候我们需要提供相同的散列算法吗?可是在上面的代码里,我们并未提供。那么Shiro是怎么做的呢?AuthorizingRealm是一个抽象类,我们会在另外的配置文件里向它提供基础算法与散列次数这两个变量。
import java.util.HashMap;
import java.util.Map;
import org.apache.shiro.authc.credential.HashedCredentialsMatcher;
import org.apache.shiro.mgt.SecurityManager;
import org.apache.shiro.spring.web.ShiroFilterFactoryBean;
import org.apache.shiro.web.mgt.DefaultWebSecurityManager;
import org.springframework.context.annotation.Bean;
import org.springframework.context.annotation.Configuration;
@Configuration
public class ShiroConfig {
    @Bean
    public ShiroFilterFactoryBean shirFilter(SecurityManager securityManager) {
        ShiroFilterFactoryBean shiroFilterFactoryBean = new ShiroFilterFactoryBean();
        shiroFilterFactoryBean.setSecurityManager(securityManager);
        Map<String, String> filterChainDefinitionMap = new HashMap<String, String>();
        shiroFilterFactoryBean.setLoginUrl("/login");
        shiroFilterFactoryBean.setUnauthorizedUrl("/unauthc");
        shiroFilterFactoryBean.setSuccessUrl("/home/index");
        filterChainDefinitionMap.put("/*", "anon");
        filterChainDefinitionMap.put("/authc/index", "authc");
        filterChainDefinitionMap.put("/authc/admin", "roles[admin]");
        filterChainDefinitionMap.put("/authc/renewable", "perms[Create,Update]");
        filterChainDefinitionMap.put("/authc/removable", "perms[Delete]");
        shiroFilterFactoryBean.setFilterChainDefinitionMap(filterChainDefinitionMap);
        return shiroFilterFactoryBean;
    }
    @Bean
    public HashedCredentialsMatcher hashedCredentialsMatcher() {
        HashedCredentialsMatcher hashedCredentialsMatcher = new HashedCredentialsMatcher();
        hashedCredentialsMatcher.setHashAlgorithmName(PasswordHelper.ALGORITHM_NAME); // 散列算法
        hashedCredentialsMatcher.setHashIterations(PasswordHelper.HASH_ITERATIONS); // 散列次数
        return hashedCredentialsMatcher;
    }
    @Bean
    public EnceladusShiroRealm shiroRealm() {
        EnceladusShiroRealm shiroRealm = new EnceladusShiroRealm();
        shiroRealm.setCredentialsMatcher(hashedCredentialsMatcher()); // 原来在这里
        return shiroRealm;
    }
    @Bean
    public SecurityManager securityManager() {
        DefaultWebSecurityManager securityManager = new DefaultWebSecurityManager();
        securityManager.setRealm(shiroRealm());
        return securityManager;
    }
    @Bean
    public PasswordHelper passwordHelper() {
        return new PasswordHelper();
    }
}
接下来,我们将目光集中到上文的shirFilter方法中。Shiro通过一系列filter来控制访问权限,并在它的内部为我们预先定义了多个过滤器,我们可以直接通过字符串配置这些过滤器。
常用的过滤器如下:
authc:所有已登陆用户可访问
roles:有指定角色的用户可访问,通过[ ]指定具体角色,这里的角色名称与数据库中配置一致
perms:有指定权限的用户可访问,通过[ ]指定具体权限,这里的权限名称与数据库中配置一致
anon:所有用户可访问,通常作为指定页面的静态资源时使用
为了测试方便我们不引入页面配置直接通过rest方式访问
不受权限控制访问的地址
import org.apache.shiro.SecurityUtils;
import org.apache.shiro.authc.IncorrectCredentialsException;
import org.apache.shiro.authc.UnknownAccountException;
import org.apache.shiro.authc.UsernamePasswordToken;
import org.apache.shiro.subject.Subject;
import org.springframework.beans.factory.annotation.Autowired;
import org.springframework.web.bind.annotation.GetMapping;
import org.springframework.web.bind.annotation.RequestMapping;
import org.springframework.web.bind.annotation.RequestParam;
import org.springframework.web.bind.annotation.RestController;
import com.learnhow.springboot.web.PasswordHelper;
import com.learnhow.springboot.web.entity.User;
import com.learnhow.springboot.web.service.UserService;
@RestController
@RequestMapping
public class HomeController {
    @Autowired
    private UserService userService;
    @Autowired
    private PasswordHelper passwordHelper;
    @GetMapping("login")
    public Object login() {
        return "Here is Login page";
    }
    @GetMapping("unauthc")
    public Object unauthc() {
        return "Here is Unauthc page";
    }
    @GetMapping("doLogin")
    public Object doLogin(@RequestParam String username, @RequestParam String password) {
        UsernamePasswordToken token = new UsernamePasswordToken(username, password);
        Subject subject = SecurityUtils.getSubject();
        try {
            subject.login(token);
        } catch (IncorrectCredentialsException ice) {
            return "password error!";
        } catch (UnknownAccountException uae) {
            return "username error!";
        }
        User user = userService.findUserByName(username);
        subject.getSession().setAttribute("user", user);
        return "SUCCESS";
    }
    @GetMapping("register")
    public Object register(@RequestParam String username, @RequestParam String password) {
        User user = new User();
        user.setUsername(username);
        user.setPassword(password);
        passwordHelper.encryptPassword(user);
        userService.saveUser(user);
        return "SUCCESS";
    }
}
需要指定权限可以访问的地址
import org.apache.shiro.SecurityUtils;
import org.apache.shiro.subject.Subject;
import org.springframework.web.bind.annotation.GetMapping;
import org.springframework.web.bind.annotation.RequestMapping;
import org.springframework.web.bind.annotation.RestController;
import com.learnhow.springboot.web.entity.User;
@RestController
@RequestMapping("authc")
public class AuthcController {
    @GetMapping("index")
    public Object index() {
        Subject subject = SecurityUtils.getSubject();
        User user = (User) subject.getSession().getAttribute("user");
        return user.toString();
    }
    @GetMapping("admin")
    public Object admin() {
        return "Welcome Admin";
    }
    // delete
    @GetMapping("removable")
    public Object removable() {
        return "removable";
    }
    // insert & update
    @GetMapping("renewable")
    public Object renewable() {
        return "renewable";
    }
}
以上就是“SpringBoot整合Shiro”的介绍,大家如果感兴趣,可以关注一下动力节点的SpringBoot教程,里面有更多知识可以免费在线学习,相信对大家的学习会有所帮助。
 Java实验班
0基础 0学费 15天面授
 Java就业班
有基础 直达就业
 Java夜校直播班
业余时间 高薪转行
 Java在职加薪班
工作1~3年,加薪神器
 Java架构师班
工作3~5年,晋升架构
提交申请后,顾问老师会电话与您沟通安排学习

官方微信

官方抖音


 京公网安备 11030102010736号