专注Java教育14年
全国咨询/投诉热线:400-8080-105
更新时间:2022-01-10 10:45:47 来源:动力节点 浏览1455次

Myeclipse 2017 CI 1
MySQL 5.7
Tomcat 8.5
在数据库中新建user表

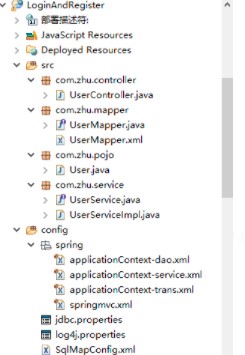
有几个主要的配置文件,先了解下每个配置文件的作用。
1. web.xml:当服务启动时首先会去加载web.xml这个资源文件,里面包括了对前端控制器、乱码问题等配置。
2.applicatonContext.xml : 一般配置数据源,事物,注解等。
在这里我使用的是applicatonContext-*.xml的形式将DAO层、Service层、Transaction层分开配置,这样便于管理
分别为applicatonContext-dao.xml、applicatonContext-service.xml、applicatonContext-transaction.xml
分开配置时,需要在web.xml中配置上下文位置
3.springmvc.xml: 里面配置的是控制层的 ,如视图解析器静态资源, mvc 文件上传,拦截器等。
4.SqlMapConfig.xml: 该配置文件为MyBatis的配置文件,里面无需配置,一切交给spring管理,但是xml文件基础配置要有。
持久层相关配置文件 applicationContext-dao.xml
<?xml version="1.0" encoding="UTF-8"?>
<beans xmlns="http://www.springframework.org/schema/beans"
	xmlns:context="http://www.springframework.org/schema/context" xmlns:p="http://www.springframework.org/schema/p"
	xmlns:aop="http://www.springframework.org/schema/aop" xmlns:tx="http://www.springframework.org/schema/tx"
	xmlns:xsi="http://www.w3.org/2001/XMLSchema-instance"
	xsi:schemaLocation="http://www.springframework.org/schema/beans http://www.springframework.org/schema/beans/spring-beans-4.0.xsd
	http://www.springframework.org/schema/context http://www.springframework.org/schema/context/spring-context-4.0.xsd
	http://www.springframework.org/schema/aop http://www.springframework.org/schema/aop/spring-aop-4.0.xsd http://www.springframework.org/schema/tx http://www.springframework.org/schema/tx/spring-tx-4.0.xsd
	http://www.springframework.org/schema/util http://www.springframework.org/schema/util/spring-util-4.0.xsd">
	<!-- 配置 读取properties文件 jdbc.properties -->
	<context:property-placeholder location="classpath:jdbc.properties" />
	<!-- 配置 数据源 -->
	<bean id="dataSource" class="com.alibaba.druid.pool.DruidDataSource">
		<property name="driverClassName" value="${jdbc.driver}" />
		<property name="url" value="${jdbc.url}" />
		<property name="username" value="${jdbc.username}" />
		<property name="password" value="${jdbc.password}" />
	</bean>
	<!-- 配置SqlSessionFactory -->
	<bean class="org.mybatis.spring.SqlSessionFactoryBean">
		<!-- 设置MyBatis核心配置文件 -->
		<property name="configLocation" value="classpath:SqlMapConfig.xml" />
		<!-- 设置数据源 -->
		<property name="dataSource" ref="dataSource" />
		<!-- 别名包扫描 -->
		<property name="typeAliasesPackage" value="com.zhu.pojo" />
	</bean>
	<!-- 配置Mapper扫描 -->
	<bean class="org.mybatis.spring.mapper.MapperScannerConfigurer">
		<!-- 设置Mapper扫描包 -->
		<property name="basePackage" value="com.zhu.mapper" />
	</bean>
</beans>
applicationContext-service.xml
<?xml version="1.0" encoding="UTF-8"?>
<beans xmlns="http://www.springframework.org/schema/beans"
	xmlns:context="http://www.springframework.org/schema/context" xmlns:p="http://www.springframework.org/schema/p"
	xmlns:aop="http://www.springframework.org/schema/aop" xmlns:tx="http://www.springframework.org/schema/tx"
	xmlns:xsi="http://www.w3.org/2001/XMLSchema-instance"
	xsi:schemaLocation="http://www.springframework.org/schema/beans http://www.springframework.org/schema/beans/spring-beans-4.0.xsd
	http://www.springframework.org/schema/context http://www.springframework.org/schema/context/spring-context-4.0.xsd
	http://www.springframework.org/schema/aop http://www.springframework.org/schema/aop/spring-aop-4.0.xsd http://www.springframework.org/schema/tx http://www.springframework.org/schema/tx/spring-tx-4.0.xsd
	http://www.springframework.org/schema/util http://www.springframework.org/schema/util/spring-util-4.0.xsd">
	<!-- 配置@Service类的包扫描 -->
	<context:component-scan base-package="com.zhu.service"/>
</beans>
applicationContext-trans.xml
<?xml version="1.0" encoding="UTF-8"?>
<beans xmlns="http://www.springframework.org/schema/beans"
	xmlns:context="http://www.springframework.org/schema/context" xmlns:p="http://www.springframework.org/schema/p"
	xmlns:aop="http://www.springframework.org/schema/aop" xmlns:tx="http://www.springframework.org/schema/tx"
	xmlns:xsi="http://www.w3.org/2001/XMLSchema-instance"
	xsi:schemaLocation="http://www.springframework.org/schema/beans http://www.springframework.org/schema/beans/spring-beans-4.0.xsd
	http://www.springframework.org/schema/context http://www.springframework.org/schema/context/spring-context-4.0.xsd
	http://www.springframework.org/schema/aop http://www.springframework.org/schema/aop/spring-aop-4.0.xsd http://www.springframework.org/schema/tx http://www.springframework.org/schema/tx/spring-tx-4.0.xsd
	http://www.springframework.org/schema/util http://www.springframework.org/schema/util/spring-util-4.0.xsd">
	<!-- 事务管理器 -->
	<bean id="transactionManager"	class="org.springframework.jdbc.datasource.DataSourceTransactionManager">
		<!-- 数据源 -->
		<property name="dataSource" ref="dataSource" />
	</bean>
	<!-- 通知 -->
	<tx:advice id="txAdvice" transaction-manager="transactionManager">
		<tx:attributes>
			<!-- 传播行为 -->
			<tx:method name="save*" propagation="REQUIRED" />
			<tx:method name="insert*" propagation="REQUIRED" />
			<tx:method name="add*" propagation="REQUIRED" />
			<tx:method name="create*" propagation="REQUIRED" />
			<tx:method name="delete*" propagation="REQUIRED" />
			<tx:method name="update*" propagation="REQUIRED" />
			<tx:method name="find*" propagation="SUPPORTS" read-only="true" />
			<tx:method name="select*" propagation="SUPPORTS" read-only="true" />
			<tx:method name="get*" propagation="SUPPORTS" read-only="true" />
			<tx:method name="query*" propagation="SUPPORTS" read-only="true" />
		</tx:attributes>
	</tx:advice>
	<!-- 切面 -->
	<aop:config>
		<aop:advisor advice-ref="txAdvice"
			pointcut="execution(* com.zhu.service.*.*(..))" />
	</aop:config>
</beans>
springmvc.xml
<?xml version="1.0" encoding="UTF-8"?>
<beans xmlns="http://www.springframework.org/schema/beans"
	xmlns:xsi="http://www.w3.org/2001/XMLSchema-instance" xmlns:p="http://www.springframework.org/schema/p"
	xmlns:context="http://www.springframework.org/schema/context"
	xmlns:mvc="http://www.springframework.org/schema/mvc"
	xsi:schemaLocation="http://www.springframework.org/schema/beans http://www.springframework.org/schema/beans/spring-beans-4.0.xsd
        http://www.springframework.org/schema/mvc http://www.springframework.org/schema/mvc/spring-mvc-4.0.xsd
        http://www.springframework.org/schema/context http://www.springframework.org/schema/context/spring-context-4.0.xsd">
	<!-- 配置Controller扫描 -->
	<context:component-scan base-package="com.zhu.controller" />
	<!-- 配置注解驱动 -->
	<mvc:annotation-driven />
	<!-- 配置视图解析器 -->
	<bean	class="org.springframework.web.servlet.view.InternalResourceViewResolver">
		<!-- 前缀 -->
		<property name="prefix" value="/WEB-INF/jsp/" />
		<!-- 后缀 -->
		<property name="suffix" value=".jsp" />
	</bean>
</beans>
SqlMapConfig.xml这个无需设置,但是必须要有
<?xml version="1.0" encoding="UTF-8" ?>
<!DOCTYPE configuration PUBLIC "-//mybatis.org//DTD Config 3.0//EN"
"http://mybatis.org/dtd/mybatis-3-config.dtd">
<configuration>
</configuration>
配置文件写好了,接下来就开始写代码
先从Mapper开始写:
1.先写一个接口UserMapper.java
package com.zhu.mapper;
import com.zhu.pojo.User;
public interface UserMapper {
	//登录验证
	User logincheck(User user);
	//注册
    void register(User user);
}
2.在写一个UserMapper.xml与之相关联
<?xml version="1.0" encoding="UTF-8" ?>
<!DOCTYPE mapper
PUBLIC "-//mybatis.org//DTD Mapper 3.0//EN"
"http://mybatis.org/dtd/mybatis-3-mapper.dtd">
<mapper namespace="com.zhu.mapper.UserMapper">
    <select id="logincheck" parameterType="com.zhu.pojo.User" resultType="com.zhu.pojo.User">
        select *
        from user
        <where>
			<if test="name != null and name != ''">
				and `name` = #{name}
			</if>
			<if test="pwd != null and pwd != ''">
				AND `pwd` = #{pwd}
			</if>
		</where>
    </select>
    <insert id="register" parameterType="com.zhu.pojo.User">
       insert into
       user(name,pwd)
       value(#{name},#{pwd})
    </insert>
</mapper>
3.接下来就是Service层了,先写一个接口:UserService.java,内容与UserMapper.java一样
4.然后写一个类实现UserService.java,代码比较简单,不做过多解释,大家不要忘了要给给它标记@Service
package com.zhu.service;
import org.springframework.beans.factory.annotation.Autowired;
import org.springframework.stereotype.Service;
import com.zhu.mapper.UserMapper;
import com.zhu.pojo.User;
@Service
public class UserServiceImpl implements UserService {
   //属性注入
   @Autowired
   private UserMapper usermapper;
	@Override
	public User logincheck(User user) {
		User u = usermapper.logincheck(user);
		return u;
	}
	@Override
	public void register(User user) {
		usermapper.register(user);
	}
}
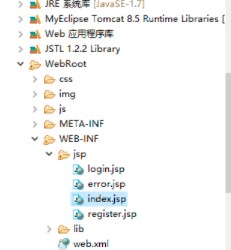
5.最后就是Controller层了,Controller层的代码主要是调用Service层实现的方法,实现一些操作,并与前端进行交互。
UserController.java
package com.zhu.controller;
import org.springframework.beans.factory.annotation.Autowired;
import org.springframework.stereotype.Controller;
import org.springframework.ui.Model;
import org.springframework.web.bind.annotation.RequestMapping;
import org.springframework.web.bind.annotation.RequestParam;
import com.zhu.pojo.User;
import com.zhu.service.UserService;
@Controller
public class UserController {
	@Autowired
     private UserService userService;
	//转向登录页面
	@RequestMapping("tologin")
	public String tologin(){
		return "login";
	}
	//登录验证
	@RequestMapping("login")
	public String  login(@RequestParam("username") String username,
			@RequestParam("password") String password,Model model){
		User user = new User();
		user.setName(username);
		user.setPwd(password);
		if(userService.logincheck(user) != null){
			model.addAttribute("username",username);
			return "index";
		}
	    else{
	    	model.addAttribute("error","账号或密码错误");
	    	return "login";
	    }
		}
	//转向注册页面
	@RequestMapping("toregister")
	public String toregister(){
		return "register";
	}
	//注册
	@RequestMapping("register")
	public String  register(@RequestParam("username") String username,
			@RequestParam("password") String password){
		User user = new User();
		user.setName(username);
		user.setPwd(password);
		userService.register(user);
		return "login";
     }
}
以上就是关于“SSM登录注册功能的实现”介绍,大家如果想了解更多相关知识,不妨来关注一下动力节点的SSM视频教程,里面的课程内容详细全面,通俗易懂,由浅到深,适合没有基础的小伙伴学习,希望对大家能够有所帮助。
 Java实验班
0基础 0学费 15天面授
 Java就业班
有基础 直达就业
 Java夜校直播班
业余时间 高薪转行
 Java在职加薪班
工作1~3年,加薪神器
 Java架构师班
工作3~5年,晋升架构
提交申请后,顾问老师会电话与您沟通安排学习

官方微信

官方抖音


 京公网安备 11030102010736号